Saturday, April 24, 2010

Lab: Installing Operating System

Operating system is a program that is used to operate your computers most important programs. The operating system is consider the backbone of the computer. It manages both the software and hardware resources. All computers have a operating system installed on it. Some of the most common operating systems are: Microsoft, Apple and Unix but there are a lot of other ones out there for specific applications. There are different types of operating systems available which are : single-user single-task, real-time, single-user multiple-task, and multi-users. You normally interact with operating systems through different types of commands.
Installing Operating System:
When it comes to installing an operating system there are some Prerequisites you must take before you can install it properly. The first step is "Determining hardware compatibility & min requirements" you can find all this information out by reading the box of the operating system that you bought and also referring the books that come with your computers. The second step is "Determine installation options" make sure you know what you are install and how to install it. The fourth step is "Determine installation method" this is just like the options you need to know what you are about to download and make sure you are going through the proper methods. The last step is "Preparing the computer for installation" this is the step you take to make sure you have all the create components and computer is connected correctly. After you established these prerequisites you are ready to install your operating systems.
Installation steps:
1.) The first step in installing is Partitioning which is the process of assigning parts to all of the hard drive.
2.)The second step in installing is File system which is where you change the File system from FAT32(OLD) to the NTFS(New) in the BIOS.
3.)The third step in installing is Formatting which is the process of preparing the portion to store data in a particular fashion.
4.) The fourth step in installing is Load system files which is loading all the appropriate files from the disk to the systems.
5.) The fifth step in installing is Checking Device Managers which is making sure that all the proper devices are installed on the computer.
6.) The sixth step in installing is Load Software which is loading information to your system.
After completing all these steps you will have successfully loaded your operating system. And you will now be able to use your computer.

Networking

Networking is the connection of multiple computers on a network sharing resources. There are different types of networks that can be set up but two of the most common ones are LAN(Local Area Network0 and WAN(Wide Area Network). The LAN is normal a connection of computers in a single office or home. The WAN is a connection of computers outside of the local area, this connection is global. WAN are normally only seen in large corporations because the have offices all around the world. The LAN like I said before are normally seen in homes networks. There are different topology's for LAN connection you have the Star, Bus, RING, and MESH just to name a few. The four basic topology's that are presented to everyone is STAR, RING, BUS, TREE.

Network Topology:


STAR: The star topology works by connect each network host to a centralize hub. This topology is the easy to design and implement. One problem with this design is if the hub fails everything will fail on the network.


RING: The ring topology is used by connecting each computer in a close loop or ring. Each machine in this network has its own address this is how they are identified. The information is passed through machine to machine to reach its destination. this network uses a token scheme which only allows one machine to transmit on the network at one time. The failure with this machine is that if one fails all will fail.

BUS: The BUS topology is connected by a backbone where each machine is connected to it. This connection is not used any more. If one of the connections fail then the whole thing is not going to work.


TREE: The TREE topology is connected to one or more computer on a lower level with a point-to-point link. The tree topology is a bigger star topology.

Optimizing Windows

Optimizing your computer helps improve it performance. If you want your computer to perform at it best potential you need to optimize. There are several different ways to optimize your computer and they are: Manage Virtual Memory and Disk Fragmentation .
Managing Virtual Memory:
- Virtual memory is a great way to utilize the more you cant see. Managing your virtual memory you are moving and swapping files from your hard drive and physical memory.
Disk Fragmentation:
- When data is stored in the hard drive it is not all placed together it is stored wherever there is some open space on the hard drive. Disk Fragment consolidates all of those files to give you more memory space. This increase the performance of your hard drive because it is now able to locate the information much fast. You need to delete any temporary files that exist in your system in the C:\ files.

Laser Printers

A laser printer produce a high quality document weather it is pictures are just your regular text document and then it presses it on the paper. Laser printers are receiving there printing jobs one page at a time instead of one line at a time like the bubble and laser jet printers. This printer can yield more prints then the other printers it can print around 3,000 - 3,600 pages. There is a process that the laser printer must go through to prepare itself for printing. It is a six step process which is: Cleaning, Charging, Writing, Developing, Transferring, and Fusing.


The EP Print Process:

1.) Cleaning- It cleans the drum by scraping any excess toner off of it. This cleaning process keeps the drum clean for another use. This step is very important because if it doesn't clean the image from the previous document will appear on your current document.
2.) Charging- This process prepares the drum for the image and the text. This step send high voltage charge to the corona wires.

3.) Writing- In this step it writes the image to the drum. The image is not permanently attached to the drum at this point.

4.) Developing- It mixes the developer and toner together to prepare it for printing. It transfers the image to the drum.

5.) Transferring- The corna wire is charged and the image is taking off of the drum and transferred to the paper.

6.) Fusing- It presses and heats the image on to the paper to give you your finished product.


Monday, February 1, 2010

Computer Memory

Memory are devices on your computer that store data on computer. Every computer comes with some physical memory.The memory determines the size and number of programs that can be run and also the amount of data that can be processed. Memory is normally referred to as the RAM which is short for Random Access Memory. When opening up a program the interface and functions are loaded into RAM. This is done so the next time you visit that site or the program want have to go throught the whole process of gather information it just goes to your memory and load it up. The memory is a very important part of the computers and the way it operates.


How to check Memory on Computer?

There are alot of ways you can check how much memory is on your computer. One of the common ways is to go through your computer system setting information. You can do this by:
1) Clicking on Start and naviagating to My Computers

2.) Then Click on the link that says System Properties

3.) When the system properties task windows pop up you can now view how much RAM you have. For Example on my laptop I have 2GB of RAM every computer RAM will vary.

The second way of check your memory is by using a memory checking program. One of the more common one is called Crucial Memory Advisor. This is use to help you find out what kind of memory you have it scans your computer and tells you how much memory is installed. There are alot of other programs avaliable that will help you find out how much memory you have on your computer.

What is the Maximum amount of memory you can have?


The maximum amount of memory your computer can have is based on two things which are: 1) What the motherboard can handle and 2) The amount of memory your operating system can handle. Those to are given because your motherboard is designed to hold only a maximum amount of RAM. If you add to much RAM to your computer it will not work efficiently. What type of memory does it need and how much memory does it need to upgrade is also based on those two factors. Because I say again if you upgrade the memory to the maximum your computer may not work efficiently due to the fact the processor is processing faster then the motherboard.


My Technical Point-of-View:

From a technical side when upgrading your computers memory making sure that you know the the correct amount of memory you can have because this is very important on how efficient your computer operate. Second you need to know if you are buying this memory for your desktop computer or your laptop computers because the memory cards are different sizes and also types. Most desktop memory are DIMM which stands for Dual Inline Memory Module and Laptop memory are SODIMM which stands for Small Outline Dual Inline Memory Modules. The third thing is to make sure by reading the manual for your motherboard to see what is the maximum amount of memory it can hold. And last but not least you need to know what type of memory your operating system can handle. So when you go to the store these are all major things you need to know when trying to upgrade your memory and also trying to find out ow much memory your computer has.

Jumpers & Adding Multiple Optical Drives

Jumpers are little pins that are used to set up components like the modem, sound cards, and hard drives. The pins are used to set the components up as either the master, slave, or cable select. For example the hard drive of my computer is set to Master because this is the only external drive that is set up on my computer. But if I were to buy an secondary hard drive I would set that to slave because it will be used as the secondary external drive. Jumper are very easy to install they just slide right in place on the position Mater, slave or cable select just like the picture above.


Adding multiple optical drives to a computer is very easy and very affordable. Depending on your computer you will have to consider whether you wish to record your own CDs or DVDs. Some of the common optical drives that are out there are: CD-ROM, CD-RW, DVD-ROM, DVD-RW, and Blu-ray drives. Once you figure out what optical drive will best fits your needs you can now install it.

1) Make sure the computer is off and power cable is not plug-in the wall outlet.

2) Remove all the screws and slide the side panel off the case.

3) Remove your new optical drive from the box and turn it to the back side.

4) You need to check the jumper settings, to make sure it is set in either master, slave, or cable select on the IDE channel.

5) Slide the drive through the front of the case and secure it with screws on the inside.

6) Connect the IDE ribbon, the power cable, and any other cables to the drive and motherboard.

7) Leave the side panel off and plug the computer into the wall outlet and turn on the computer on.

8.) If everything is attached correctly you can now put the side panel back on and start burning, copying, playing or whatever your heart desires with your new installed optical drive.


How do you use the optical drives and Where can you use it?
In the real world optical drives are drives that we use more than printers, scanners or other things that. Optical drives are normally used to burn data to disc, read data from disc, program loading, and playing games. If you dont have the correct drive attached this may prevent you from doing some of those common things like burn cd's or dvd's. I know when I first started going to my school on the computers they had two optical drive set up the top one is set to master because it is the primary drive and the second one is set to slave because it functions as the secondary drive. I used it before when I need to burn some cd's. What I had to do was place the originally cd in the first drive and copy it to the computer and then place the blank cd in the second drive and burn it onto it. So you can use these optical drives wherever you need it.

Tuesday, January 26, 2010

Bubble- Jet Printer

The Bubble-jet Printer is the new advanced inkjet printer. These product is very low in cost and very light weight. Bubble-jet printers work by create heat to vaporize the ink to produce bubbles that are then push through the ink head as very tiny drops of ink on the paper.


Components of Bubble-jet Printer:
  • Paper Tray- Is were you load your paper into the printer. This is the plastic try located on the front of printers.

  • Paper Feed Sensor- This tells the printer when there is no paper avaliable when you are trying to print and when the printer is jammed.

  • Pickup Rollers - The rollers that are inside the printer. These rollers are used to roll the paper from the paper feeder into the printer.

  • Separator Pads- This is what keeps more then one sheet of paper from coming through.

  • Printhead and Carriage- The printer head is the nozzles that the ink goes through. On most printers the printhead is located on the bottom of the printhead carriage which holds the ink cartridges.


Motherboard (MB)

Motherboard (MB) also known as the planner board or the system board is the spine of the computer. All components for the computer connect to the motherboard. The motherboard is what allows you to communicate and also send data. This is the most important piece of a computer. Since we know that all components are connected to the motherboard I am about to list some of the common components that can be found on it. The common components on a motherboard are: Chipsets, expansion slots and buses, memory slots, CPU, power connectors, onboard disk drive connectors, keyboard connectors, peripheral ports, BIOS, CMOS battery, Jumper, and Firmware I am going to go in depth about these components later. The MB comes in two major types which are: Nonintegrated and Integrated system board.


Nonintegrated:
On this motherboard all the components like the video and USB ports are added using the expansion slots on the board. These system boards are very easy to fix because you don’t have to replace the board when a component breaks you just need to go a purchase the same component and reconnect it to your computer. These motherboards are not being used in computers now but you may still find some.


Integrated:
On this Motherboard the components like sound and the modem are already attached. Some people believe that there are a lot of drawbacks with this board. I say this because f a component breaks most people will tell you that you need to purchase a new motherboard. But from my reach I have found that you don’t need to do that you just have to go and purchase a expansion card for the component that broke.

ISA Expansion Slots

ISA Expansion Slots & Cards
The Industry Structured Architecture as known as ISA or AT Bus is used in most PC's to add expansion slot cards. ISA are more commonly used for adding video cards, networking cards, and external serial ports. When looking up information on ISA you will find that it comes in two versions which are: 8 Bits & 16 Bits slots. The 8 Bit expansion slot was introduced in early 80's.The 8 Bit bus is very slow and runs at a 4.77 MHz The 8 bit expansion cards are small and have one set of fingers on them. The fingers are those gold lines on the card. The 16 Bit expansion slot was also introduced a couple of years later and runs faster because it operates at 8 MHz speed. The 16 Bit ISA bus expansion slot has two sets of fingers on them. The 16 Bit ISA bus can be found in 286, 386, 486, and Pentium computers. The 8 Bit and 16 Bit expansion cards can use the same slot on the system board. The ISA expansion slots are normally black.

8 - Bit Expansion Card & Slot:


16 -Bit Expansion Card & Slot


Since I know what the ISA Expansion Slot is I now have to answer the question How is the ISA Expansion Slots used?

ISA Expansion slots are used in the real world to expand your capabilities. This basically expands what you computer can do. So let say from a computer tech point of view if I wanted to expaned the video component on my computer I would just go to the store and purchase a video expansion card that will be compatible with my expansion slot on my motherboard.

Thursday, January 14, 2010

Multi-monitor


Have the ability to work on multiple documents at one time is awesome. You can do this with setting up multiple monitors on your computer. With this feature you will be able to work on two things at one time.

Multi-monitors:
Are multiple monitors that are hooked up to one computer. A lot of people use them to view two documents at one time. Some of the most common places we see multiple monitors being used are in: record studios, graphic design companies, and video editing companies. When setting up your multiple monitors you need to make sure you have the right components like: two video cards or either one video card that has multiple video outputs. Without the right components you will not be able to set up dual monitors (multi-monitors).

Settings changes for multiple monitors:
Changing the settings for your multi- monitors is very easy you have to navigate back to your display settings and click on the number 2 which is the second monitor to active it and then check the extended monitor but to be able to connect another monitor to your laptop or desktop computer. It is as easy as one, two, three and you 2 monitor is hooked up. You will have to set up the refresh rate and resolution to make the settings match for both monitors.

Refresh Rate


Have you ever been working on your laptop or desktop computer and you feel like the screen resolution is not correct. Well there is a reason for that your Refresh Rate may not be set correctly. I know a lot of people are wondering what a Refresh Rate is at first I didn't know what it was either but after reading Chapter 3 I have a better idea. I am now going to example what the Refresh Rate is and show you the proper steps to changing the Refresh Rate on your laptop or desktop computer.


Refresh Rate:
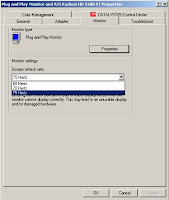
This is the display rate for which your computer is renewing the images on it. The correct refresh rate will resolve the issues like screen flickering and any other display issues you may have with your monitor. The normal default refresh rate is done per second and is measured in Hertz. Let’s take my laptop for an example: My default Refresh Rate is 60 Hz this means that my image is being refreshed 60 times in one second. If you set your refresh rate too high it will make your screen unusable and you will normally get an error message stating that the refresh rate is not compatible with this monitor. So you have to make sure your set the correct refresh rate. Now I am going to show you how to change you refresh rate on your computer.

Changing Refresh Rate:
It is very easy to change your refresh rate on your computer. You just need to navigate to the display setting on your computer and then click your advance settings. This will bring up another box and on that box you should navigate to the monitor tab and there is where you can change your refresh rate.

What is a Computer and What is the Components?

In my reading of the book I found out that a computer is a device that can help you store, receive, and even process data. We all know that computers are broken down into two parts known as the hardware and the software. Below is a picture of the hardware and the software and there definitions.


Hardware:
The hardware on a computer are things like: keyboard, mouse, speakers, and monitors which are the physical part of the computer which are everything that you can see and physical touch.


Software:
The software on a computer are the programs you install on your computer. The software is used to tell the hardware on the computer what to do. Software are broken down into operating systems and application programs.

A computer can come in many sizes and also have many types. There are two major types of computers people normally buy and they are: Portable (laptop, notebook), and Desktop. Both the Portable and the Desktop computers are made up of the components and they are:

1.) Motherboard – The spin of the computer which is where all the components are attached.
2.) CPU – This carries instructions to the different parts of the computer.
3.) Hard Drive- Are where the files are stored on the computer.
4.) Power Supply- The source of the electrical power.
5.) RAM – Is the memory, the computer storage.
6.) Video- Is how you view images on the computer.
7.) Sound- Is the audio for the computer.
8.) Optical Drive (CD-RW, DVD-RW, CD-RW/DVD-RW) - Reads data from a disk.
9.) Case- Houses the computer components.

When purchasing a computer you must make sure that you have some knowledge of what a computer is and the things that come with it. You should always remember the things like the monitor and keyboards are the hardware of the computer and the things like Windows 7 and Norton security are the software of the computer. Having the knowledge of these things will help you learn the major computers functions more easily.